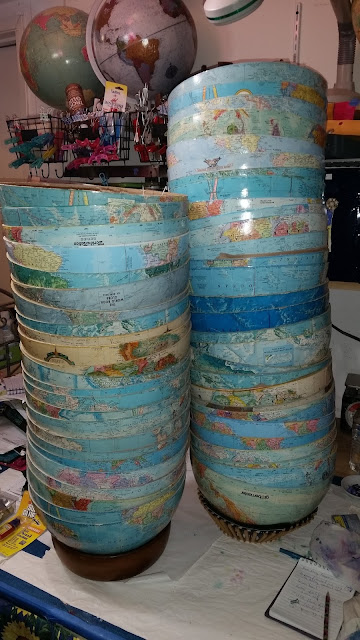
55 Globe Bowls... tick... tick... tick...
 |
| Most of my cut globes |
 |
| The bases with holes drilled in them |
9/11/15 update - have gotten all the gluing done (whew!). Now on to the sanding of the insides and edges.
And on a different note,
The victims and heroes of 9/11 are in my thoughts and prayers today!
Tick... tick... tick... the sound of the clock. There is NOTHING like a deadline to make you aware of time! Specifically, how LITTLE time you have to get your project done!
I've created a checklist for myself so I know what I need to do and when I need to have it all done. I thought perhaps that would help me feel more organized - and it does... but it also feels like I've put a bunch more pressure on myself rather than alleviating it.
- __x_Do I have enough globes? YES. (Whew!)
- __x_Do I have enough bases? yup.
- ____Do I have enough hardware .. thought I did. NOPE. Gotta go get slightly longer screws.... sigh. I thought I had the right size, but didn't take into account that some of the globes actually have an odd curve at the bottom on the inside of the globes.
- __x_Cut the globes in half along the equator. Done.
- __x_Fix parts that came unglued or are coming apart (Done 9/11/15)
- _x__Clean outside of the bowls
(in progress)DONE 09/07/15 - ____Sand the edges and insides if needed (in progress)
- ____Apply first coat of paint to the inside of bowls
- ____Sand the insides to knock off any high spots of paint (paper bowls have LOTS of little fibers that stick up )
- __x_Drill holes through all the bases (hooray! I did it using my $3 drill press I found at a garage sale - it worked like a champ!!)
- ____Lightly sand/de-gloss all the bases
- ____Paint all the bases black (per the customer's request)
- ____Seal all the bases
- ____After letting the bases dry for several days, use glue, washers, bolts, and nuts to adhere bases to bowls.
- ____Apply a 2nd coat of paint to the insides of the bowls (and the washers and bolt-heads as well)
- ____Apply a 3rd coat of paint if needed
- ____Let dry for several days before packaging for shipping
- ____Add business labels to the bottom of the bases.
- ____Package for shipping
- ____Ship to client
 |
| Coaster holders |
As a side note, I ended up with all the coaster-holders (coasters are being used as the bowl-bases). The coaster holders are modern-looking wood with a bit of metal. I have ten of them...what to do with them? Then it hit me (duh).... they are perfect for bowl bases too--- just turn them over!
I have quite a few globe-bottoms that are about 1/3 of the globes... and was planning on (some day) making them into bowls as well. Perfect! Here's a mock-up of how it'd look. I think it's pretty eye-catching. Hopefully someone will want them. :)
 |
| Bowl on coaster holder mockup |
I just love it when I can fully use items with little-to-no waste (up-cycling at it's best)!


Why were you making so many half globe bowls? What did you do to the inside to fill in the cardboard gaps? Did the coasters work really well? I am participating in the Houston Food Bank's Empty bowl project and I bought a globe at Goodwill think I must be able to do something with this that others will enjoy. I am out surfing for ideas now.
ReplyDelete